After the fiasco of using a Magpul UBR Stock copy for my Glock, which turned out to be too heavy for the unit, I wanted to use the lightest possible M4 Stock available to pair with my Endotactical Tactical Stock Adapter - Glock (TSA-G). After looking around some firearms forums, it turns out that the stock or factory standard M4 Collabsible Stock is among the lightest available.
I chose the standard Mil-spec M4 stock mainly because it was available, and cheaper than the other light stocks like the Colt Super-Stoc of Magpul CTR. In terms of looks, it doesn't look too bad either. I got the "ribbed" version (as opposed to the "dotted" or "ultra-thin" version. Oh, wait, those are for other things, sorry), which I assume to be the more modern one as it allows various accessories to be fitted to the stock if you so desire.
I wasn't able to measure the weight of the stock, but information from the forum threads say they are around 6 ounces, or less than half a pound. Material is reportedly some sort of ABS Plastic, and the workmanship was fantastico! No flashes or other imperfections to be found anywhere on the stock. The finish was quite good, best seen in actual because it doesn't translate very well into digital pictures.
Showing posts with label Glock. Show all posts
Showing posts with label Glock. Show all posts
Sunday, July 8, 2012

Sunday, June 10, 2012
My Review of the Burris Fast Fire 3 Part Two
In terms of width, the FF2 and FF4 are the same. However, the FF3 is both a bit longer and taller than the FF2. Despite these differences, though, the FF3 will still fit on existing mounts made for the FF2. Since it is a bit longer, it does protrude a bit lengthwise on my Glock Slide Mount.
Top view of both sights, showing the longer length of the Burris FF3
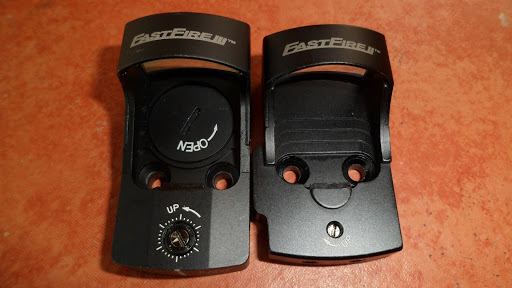
The taller profile of the FF3 gives it a slightly better field of view compared to the FF2, which is pretty good from a practical point of view. However, the taller profile doesn't look very good, and sort of ruins the sleek appearance of the sight, especially the side profile. In terms of overall looks, I think the FF2 is better than the FF3.
Front view of both sights, showing the taller profile of the Burris FF3

The Gasket on the bottom of the sight is also different. On the FF2, it is wide and loose, which actually ended up being damaged slightly after I installed/removed it 2-3 times. On the FF3, it is smaller with a different shape, and is fixed, making it more durable and less likely to be damaged during installation/removal.
Sunday, May 27, 2012
(Video) My Glock 22 in its Machine Pistol Mode Part One
They said a picture is worth a thousand words, so a video would be even more so. That's why I decided to take a video of my Glock 22 in what I call its "Machine Pistol Mode" so people can capture a bit more detail that just the words and pictures I have posted here thus far. I intend to make a couple more over the next couple of weeks or months, depending on how much more detail I feel I can share more with videos.
Forgive the mediocre camera focus, I used only a Samsung PL120 Digital Camera. It works very well with still pictures, but apparently not very much with indoor close up videos. I hope I can rectify this on my next videos. So now here is the video itself:
http://www.youtube.com/watch?v=u4NVUuxLP20
Forgive the mediocre camera focus, I used only a Samsung PL120 Digital Camera. It works very well with still pictures, but apparently not very much with indoor close up videos. I hope I can rectify this on my next videos. So now here is the video itself:
http://www.youtube.com/watch?v=u4NVUuxLP20
Wednesday, May 23, 2012
Glock Rear Sight Installation
I've had some problems installing the Polymer rear sights on my Glocks, so I decided to write a long article here about some of the lessons I've learned during those instances. I have had to remove the factory sights on my Glock 23 and Glock 22 to make way for my Burris Fast Fire II Reflex Sight. Now the Burris FF2 will be with the Glock 22, and I ruined one factory sight installing it on my Glock 23 before finally succeeded.
'Glock Rear Sight Tool'
I haven't found a way to remove those factory sights without ruining them. I tried twice, and each time just destroyed both sights. The best way to remove and/or install these factory sights, would be by the use of a Glock Rear Sight Tool. It consists of a vise and some inserts to hold the sight properly and tightly as it is being removed or inserted, and allows accurate and easier installation/removal of the sights without ruining them.
However, these Sight Tools are pretty expensive, starting at around USD 90 and up if you buy them online. If you find any lower than USD 90, then that's a bargain already. Its even more expensive at the Makati Cinema Square Gun Stores, where they are selling them for P12k (USD 280) each. The price is just too high for something you will seldom use, so if you are not awash with cash, then you will have to just find some other way to do it.
'Glock Rear Sight Tool'
I haven't found a way to remove those factory sights without ruining them. I tried twice, and each time just destroyed both sights. The best way to remove and/or install these factory sights, would be by the use of a Glock Rear Sight Tool. It consists of a vise and some inserts to hold the sight properly and tightly as it is being removed or inserted, and allows accurate and easier installation/removal of the sights without ruining them.
However, these Sight Tools are pretty expensive, starting at around USD 90 and up if you buy them online. If you find any lower than USD 90, then that's a bargain already. Its even more expensive at the Makati Cinema Square Gun Stores, where they are selling them for P12k (USD 280) each. The price is just too high for something you will seldom use, so if you are not awash with cash, then you will have to just find some other way to do it.
Sunday, May 13, 2012
My Review of the Burris Fast Fire 3 Part One
I was relatively happy with my Burris Fast Fire 2 (FF2), but when the Burris Fast Fire 3 (FF3) came out, I saw that they had made some important and significant improvements that could make it a worthwhile upgrade. So I waited until the price dropped down, and bought one.
'Reticle Size'
One of the main and obvious improvements they made with the FF3 is that it now comes in two reticle sizes, 3 Minute of Angle (MoA), and 8 MoA. You cannot have both reticle sizes on one sight, you have to specify which one you would like to get when you buy it. The FF2 came with one reticle size only, at 4MoA. It was okay, but I found it a bit small, and hard to quickly find sometimes, especially when you are moving your handgun with your sight on it around.
The advantage of relatively small reticle sizes, is that you can hit further with it, because the sight will not be covering much of the target. However, since I will be using my FF3 on my Glock which I don't generally intend to shoot more than 100 meters, I would prefer a bigger reticle size, and that is why I decided to get the FF3 with the 8MoA reticle size.
Sunday, April 29, 2012
Color Filling Your Glock's Engravings with Nail Polish
I found some videos on Youtube with instructions on how to add colors to your firearms' engravings. Some use Crayons, some with Modelling Paints, but I chose to do mine using Nail Polish because I felt it would be more durable than using Crayons, and yet easier to find than other paint materials. Here is the video that I used for instructions:
http://www.youtube.com/watch?v=vcLzaxqsOCEThis works not only on the slide, but on the Polymer magazines as well. Here are the end results on my Glock 22:


Just follow the instructions on the video, and you should be fine. A couple of important notes, though to remember, though, based on my experience doing this:
'Choosing the Materials'
I used the "Caronia" brand for the Nail Polish, and "Bobbie" brand for the Nail Polish Remover, although any other brand you can find will do. These can easily be bought at your neighborhood SM Department Store. If the Saleslady starts giving you strange looks, just explain right away that you are using these for your gun's engravings. Of course, she will probably just think, "Yeah, right". The polish and remover are dirt cheap, I was able to buy 2 colors and 1 remover for under P100.
When choosing the Nail Polish colors, remember to choose "bright" colors (i.e. White, Yellow, etc.) as much as possible. If you are to use "dark" colors (i.e., Red, Blue, etc.), try to use the "brighter" versions of these dark colors, like "Bright Red", for example. Or "Neon Blue". The reason is that if you don't use them, you won't be able to see much the colors once it dries against the flat black background of the slide. One suggestion is that if you can't find a bright version of Red, then Orange is a good substitute.
Wednesday, April 25, 2012
My Glock 22 in Machine Pistol Configuration
I was generally satisfied with the Glock 23 Machine Pistol configuration that I assembled, it can easily contain short full automatic bursts into a man-sized target at around 13 meters. However, I felt I could build a better Machine Pistol, one that would enable me to shoot full automatic bursts accurately at even longer ranges. For this reason, I decided to buy a Glock 22, as I felt the recoil-reducing accessories and/or parts necessary for building a better Glock Machine Pistol are only currently available on the full-sized Glocks.
These recoil-reducing accessories are mainly the Endotactical Tactical Stock Adaptor - Glock (TSA-G), coupled with a Magpul Utility Battle Rifle (UBR) Stock. I have reviewed these separately, you can find them here and here. Aside from this, I also used the CAA Tactical Folding Grip Glock - Small (FGG-S), and a Lone Wolf Compensator (coupled to a Lone Wolf Threaded Barrel).

'First Firing Range Session'
With everything more or less ready, I took my Glock 22 in its Machine Pistol configuration into the shooting range for the first time. I used Target Boards, at my standard range of 13 meters. First test was using the STOCK or FACTORY BARREL, with 50 rounds of Semi-Wadcutter, Teflon-Coated (SWC-TC) reloads in standard .40S&W loadings. Recoil was quite noticeable, with the UBR Stock jumping up and into my shoulders with some vigorousity.
Sunday, April 22, 2012
My Magpul UBR for Glock Review
'Magpul UBR Stock'
I was able to buy a China-copy of the Magpul UBR to go with my Endotactical TSA-G. I went with the Magpul UBR mainly because of its looks. I have seen pictures of Glocks with the TSA-G and Magpul Compact Type - Restricted (CTR) stock, and it looked awkward, as the stock looked too big for the pistol. On the other hand, the Magpul Utility Battle Rifle (UBR) looked just about right with the pistol as it is less bulky overall compared to the CTR stock.
In fact, among all the Magpul stocks, as well as collapsible M4 Carbine stocks made by other manufacturers, the UBR looks the most compact, probably after the Ace Ultralight Stock. The Ace Ultralight Stock was actually my first choice, but I just couldn't find anybody selling it in the country, or online.
The seller advertised it as a "Magpul PTS UBR", but I know better, because the unit is marked "Magpul Industries Corporation" on one side, and "Boulder, Colorado, USA" on the other side. A genuine Magpul PTS UBR would've been marked "Magpul PTS" and/or "Professional Training and Simulation". Besides, the unit was priced only have of what a genuine Magpul USA or PTS UBR.
The unit is very well made, though. The workmanship is excellent, very little flashes, no unsightly marks, and the fit of the parts are tight, almost no wobble when the stock is fully extended. The only fly in the ointment is a wayward nut that was not installed properly on one side of the unit, causing it to tilt during installation, of which up to now I am unable to correct. Nevertheless, I'm pretty happy with the unit.
The unit felt a bit rear-heavy initially, so I decided to remove all the items that I do not intend to use with the unit, namely the:
- Storage Plate and Cover;
- Quick Disconnect (QD) Sling Mounts, both front and rear, and the Screws, Nuts, Washers, and Mounting Cups.
I was able to buy a China-copy of the Magpul UBR to go with my Endotactical TSA-G. I went with the Magpul UBR mainly because of its looks. I have seen pictures of Glocks with the TSA-G and Magpul Compact Type - Restricted (CTR) stock, and it looked awkward, as the stock looked too big for the pistol. On the other hand, the Magpul Utility Battle Rifle (UBR) looked just about right with the pistol as it is less bulky overall compared to the CTR stock.
In fact, among all the Magpul stocks, as well as collapsible M4 Carbine stocks made by other manufacturers, the UBR looks the most compact, probably after the Ace Ultralight Stock. The Ace Ultralight Stock was actually my first choice, but I just couldn't find anybody selling it in the country, or online.
The seller advertised it as a "Magpul PTS UBR", but I know better, because the unit is marked "Magpul Industries Corporation" on one side, and "Boulder, Colorado, USA" on the other side. A genuine Magpul PTS UBR would've been marked "Magpul PTS" and/or "Professional Training and Simulation". Besides, the unit was priced only have of what a genuine Magpul USA or PTS UBR.
The unit is very well made, though. The workmanship is excellent, very little flashes, no unsightly marks, and the fit of the parts are tight, almost no wobble when the stock is fully extended. The only fly in the ointment is a wayward nut that was not installed properly on one side of the unit, causing it to tilt during installation, of which up to now I am unable to correct. Nevertheless, I'm pretty happy with the unit.
The unit felt a bit rear-heavy initially, so I decided to remove all the items that I do not intend to use with the unit, namely the:
- Storage Plate and Cover;
- Quick Disconnect (QD) Sling Mounts, both front and rear, and the Screws, Nuts, Washers, and Mounting Cups.
Thursday, April 12, 2012
The Truth About Lone Wolf Barrels for Glock
I decided to write a long piece about Lone Wolf Distributors' (LWD) barrels for Glock, when I noticed that wrong information about these barrels are still prevalent. I own samples of these barrels, and I want to share what I found about them based on my personal shooting experience with them.
'For Shooting Reloads on Glock'
If you look around the local internet firearms forums or local sales/auction sites, you will notice that most of them recommend the use of these barrels so you can shoot reloads on Glock pistols. Glock pistols come from the factory with its own patented type of "Polygonal Rifling", which they claim lessen friction between the barrel and the bullet, thus increasing the velocity of the bullet as it leaves the barrel.
Unfortunately, such rifling tends to build up more deposits in the barrel at a faster rate, which, if the build up is sufficient enough, could cause certain types of catasthropic failures during firing in one form, or the other. This is the reason why Glock in their manual specify that lead bullets NOT be used using the stock or factory barrel.
'For Shooting Reloads on Glock'
If you look around the local internet firearms forums or local sales/auction sites, you will notice that most of them recommend the use of these barrels so you can shoot reloads on Glock pistols. Glock pistols come from the factory with its own patented type of "Polygonal Rifling", which they claim lessen friction between the barrel and the bullet, thus increasing the velocity of the bullet as it leaves the barrel.
Unfortunately, such rifling tends to build up more deposits in the barrel at a faster rate, which, if the build up is sufficient enough, could cause certain types of catasthropic failures during firing in one form, or the other. This is the reason why Glock in their manual specify that lead bullets NOT be used using the stock or factory barrel.
Monday, April 9, 2012
My Endotactical TSA-G Review
'Endotactical TSA-G'
The Endotactical Tactical Stock Adapter - Glock (TSA-G) was actually the main reason for my buying a full-sized Glock. The TSA-G fits only full-sized Glock at the moment, and I felt it was much superior than the GLR440 Stock I used on my Glock 23 as it attaches to the Glock on 2 points, compared to the one point on the GLR440. Because of this, you will have better control of the Glock during recoil.
Another advantage of the TSA-G, is that you can use much more solid stocks built for the M4 Carbine, as opposed to the relatively flimsy 1" width Polymer stock of the GLR440. These two advantages I felt will enable much better control of the weapon during full-auto, not resulting in that diagonal climb to 1-2 o'clock that I found when using the GLR440 stock.
I got what is likely to be a China-copy of the TSA-G from a shop at the Makati Cinema Square (MCS). The reason I think it is a China-copy, are three things: First, is the price. The original sells for USD 150 in the US, while I bought it for only P 3,500 (approximately USD 81). Second thing is that the Retaining Pin that secures the unit to the Glock is made of Polymer, while the ones I saw on the videos for the original TSA-Gs are made of Stainless Steel. I don't think this will be much of a factor on the function of the unit, though.
Third is that there is no small ball chain that secures the Retaining Pin to the TSA-G, while the original always had one. I had to buy a small ball chain from the SM Department stor to secure that Retaining Pin to the TSA-G, and keep it from getting lost during handling.
The Endotactical Tactical Stock Adapter - Glock (TSA-G) was actually the main reason for my buying a full-sized Glock. The TSA-G fits only full-sized Glock at the moment, and I felt it was much superior than the GLR440 Stock I used on my Glock 23 as it attaches to the Glock on 2 points, compared to the one point on the GLR440. Because of this, you will have better control of the Glock during recoil.
Another advantage of the TSA-G, is that you can use much more solid stocks built for the M4 Carbine, as opposed to the relatively flimsy 1" width Polymer stock of the GLR440. These two advantages I felt will enable much better control of the weapon during full-auto, not resulting in that diagonal climb to 1-2 o'clock that I found when using the GLR440 stock.
I got what is likely to be a China-copy of the TSA-G from a shop at the Makati Cinema Square (MCS). The reason I think it is a China-copy, are three things: First, is the price. The original sells for USD 150 in the US, while I bought it for only P 3,500 (approximately USD 81). Second thing is that the Retaining Pin that secures the unit to the Glock is made of Polymer, while the ones I saw on the videos for the original TSA-Gs are made of Stainless Steel. I don't think this will be much of a factor on the function of the unit, though.
Third is that there is no small ball chain that secures the Retaining Pin to the TSA-G, while the original always had one. I had to buy a small ball chain from the SM Department stor to secure that Retaining Pin to the TSA-G, and keep it from getting lost during handling.
Wednesday, April 4, 2012
Magpul Products' Availability in the Philippines
(Update Note: I have updated this blog, click here to read about the latest developments about the topic)
MAGPUL is a relatively new company, that has taken the firearms world by storm the last couple of years. The company's official name is "Magpul Industries Corporation", and was founded in 1999. The company is best known for their plastic accessories and parts, specifically for the AR-15/M-4 platform, and their products are not only very well made, but also very elegant and high-tech looking, which is a big part of their success.
I started buying some of their stuff for my Glock (why I am buying M-4 parts for my Glock? Long story, to be taken in other blogs), and I have had a bit of confusion with regards to which of their products are genuine, which are copied from China, etc. So I did a little bit of research, and I would just like to share some of the things I found out.
First, it turns out that Magpul has two main plants in different locations, producing slightly different parts. And these are MAGPUL USA, and MAGPUL PTS.
'Magpul USA'
Magpul USA or officially, "Magpul Industries" is located in Colorado, USA, and the most important thing to remember about them and their products, is that they only serve the US market. US laws by default forbid them to export these parts and/or accessories for high powered rifles to other countries. They can apply for export of these parts and accessories, but for some reason, they have opted not to do so. As a result, this has had a huge impact on the prices of their products outside of the USA.
That inability to export their products is the primary reason for the outrageous prices of ORIGINAL Magpul USA parts in the Philippines. For example, a "Magpul Compact Type - Restricted" (CTR) Stock in the US costs only USD 80, but some shops at the Makati Cinema Square (MCS) sells the same products for approximately USD 348. That is more than four times the retail price in the US. Another example, would be the Magpul Back Up Sight (MBUS) Generation 2 sights, for example. These retail for only USD 40 in the US, but in an MCS shop? P12,000 (approximately USD 279), or around SEVEN times as much.
MAGPUL is a relatively new company, that has taken the firearms world by storm the last couple of years. The company's official name is "Magpul Industries Corporation", and was founded in 1999. The company is best known for their plastic accessories and parts, specifically for the AR-15/M-4 platform, and their products are not only very well made, but also very elegant and high-tech looking, which is a big part of their success.
I started buying some of their stuff for my Glock (why I am buying M-4 parts for my Glock? Long story, to be taken in other blogs), and I have had a bit of confusion with regards to which of their products are genuine, which are copied from China, etc. So I did a little bit of research, and I would just like to share some of the things I found out.
First, it turns out that Magpul has two main plants in different locations, producing slightly different parts. And these are MAGPUL USA, and MAGPUL PTS.
'Magpul USA'
Magpul USA or officially, "Magpul Industries" is located in Colorado, USA, and the most important thing to remember about them and their products, is that they only serve the US market. US laws by default forbid them to export these parts and/or accessories for high powered rifles to other countries. They can apply for export of these parts and accessories, but for some reason, they have opted not to do so. As a result, this has had a huge impact on the prices of their products outside of the USA.
That inability to export their products is the primary reason for the outrageous prices of ORIGINAL Magpul USA parts in the Philippines. For example, a "Magpul Compact Type - Restricted" (CTR) Stock in the US costs only USD 80, but some shops at the Makati Cinema Square (MCS) sells the same products for approximately USD 348. That is more than four times the retail price in the US. Another example, would be the Magpul Back Up Sight (MBUS) Generation 2 sights, for example. These retail for only USD 40 in the US, but in an MCS shop? P12,000 (approximately USD 279), or around SEVEN times as much.
Sunday, January 29, 2012
My Fab Defense KPOS for Glock Review Part Three
'FSSG for the KPOS'
My one and only biggest frustration about the KPOS right now, is making an FSSG work on it. First problem, is that you will need a special FSSG (Fire-Selector Switch for Glock) for it, instead of the usually cheaper, flat, sliding or rotary FSSGs that are more readily available. This is because you need a backplate that will act both as an FSSG, and also as anchor for the removable cocking lever. This means you will have to get the rarer, and more expensive variant of the FSSG.
As for installing the FSSG on the Glock: They replace the backplate, and instead of my usual routine of removing the slide from the frame and replacing the backplate, you needed to replace it while the slide is still attached to frame. This is because the FSSG is bulky, and if you install it on your slide and slide it to your frame, it will snag with some of the frame's protrusions.
The way to install it is to lock back the slide using the slide release, then replace the backplate with the FSSG. This would also mean that you will NOT be able to disassemble the slide from the frame easily, you will have to remove that FSSG first, before you can remove the slide from the frame.
'FSSG Fitting Problem'
I was able to buy an FSSG from Bro Spitfire, and it needed gunsmith fitting. There is a sword-like protrusion on the FSSG that goes forward and backwards, and it controls whether the gun goes full-auto or not. The depth or distance of this protrusion seems to vary per model, and is built oversized so the gunsmith can slowly file away by trial and error the length of that protrusion. So what the gunsmith did was file it down a little, assemble, then test by firing a couple of rounds off.
The second problem was that the Gunsmith didn't turn out to be very familiar with the product, and made a crucial mistake: He got confused on when the FSSG was supposed to go full, or semi-auto. So he put the gun on extended or full auto settings, and then filed it down to semi-auto. The result: The FSSG won't go full auto anymore.
My one and only biggest frustration about the KPOS right now, is making an FSSG work on it. First problem, is that you will need a special FSSG (Fire-Selector Switch for Glock) for it, instead of the usually cheaper, flat, sliding or rotary FSSGs that are more readily available. This is because you need a backplate that will act both as an FSSG, and also as anchor for the removable cocking lever. This means you will have to get the rarer, and more expensive variant of the FSSG.
As for installing the FSSG on the Glock: They replace the backplate, and instead of my usual routine of removing the slide from the frame and replacing the backplate, you needed to replace it while the slide is still attached to frame. This is because the FSSG is bulky, and if you install it on your slide and slide it to your frame, it will snag with some of the frame's protrusions.
The way to install it is to lock back the slide using the slide release, then replace the backplate with the FSSG. This would also mean that you will NOT be able to disassemble the slide from the frame easily, you will have to remove that FSSG first, before you can remove the slide from the frame.
'FSSG Fitting Problem'
I was able to buy an FSSG from Bro Spitfire, and it needed gunsmith fitting. There is a sword-like protrusion on the FSSG that goes forward and backwards, and it controls whether the gun goes full-auto or not. The depth or distance of this protrusion seems to vary per model, and is built oversized so the gunsmith can slowly file away by trial and error the length of that protrusion. So what the gunsmith did was file it down a little, assemble, then test by firing a couple of rounds off.
The second problem was that the Gunsmith didn't turn out to be very familiar with the product, and made a crucial mistake: He got confused on when the FSSG was supposed to go full, or semi-auto. So he put the gun on extended or full auto settings, and then filed it down to semi-auto. The result: The FSSG won't go full auto anymore.
Wednesday, January 11, 2012
My Fab Defense KPOS for Glock Review Part Two
'Burris Fast Fire II'
The generic Taiwan HUD I was using was giving me a bit of a headache after using it, I think its because they used some sort of a low-power laser for the dot, and I was worried it might be doing some long-term damage to my eyes. So I decided to replace it with a branded one. I chose the Burris Fast Fire II as it is a low-profile sight, and fits well with the low overall profile of the KPOS. I bought it online, and the unit arrived in an ordinary, unmarked box, not in the original manufacturer's box. It was generously wrapped in bubble wrap to ensure safe and proper transport. It came with a spare battery only, and despite not having any manual with it, I was able to find instructions in the internet on how to replace the battery.
I read in the internet that these Burris scopes are made in the Philippines, and it was confirmed when I saw in the battery well prominently marked saying, "Made in the Philippines". I wonder which local electronics company is making this?
Thursday, December 29, 2011
My Fab Defense KPOS for Glock Review Part One
My experience with the Airsoft EMA Roni Carbine Conversion Kit for Glocks was so positive, that I went out and bought the Fab Defense KPOS Carbine Conversion Kit for my Glock 23. Going to get rid of my other firearms, and am ready to go Glock-crazy.
There were two things that convinced me to by the KPOS instead the Roni; First is that the clearance of the KPOS over the ejection port of the Glock was much wider and lower than that of the Roni. This means less or none of the stovepiping issues I found with the Airsoft Roni.
Second was the fact that the muzzle tube of the KPOS is much bigger and allows for more room for the muzzle blast of expand, unlike the much more enclosed space of the Airsoft Roni's muzzle tube, which resulted in flame damage to the muzzle of my Glock's slide.
This picture shows the kit's clearance over the ejection well

This pic shows the muzzle clearance to the pistol

I bought the unit for P32k at Armscor, and it came with the following items:
- Large, black polymer case with gray foam lining;
- Carbine conversion unit;
- Special rear back plate for use with the KPOS;
- Tool for rear plate removal;
- Manual;
- Under the arm sling;
There were two things that convinced me to by the KPOS instead the Roni; First is that the clearance of the KPOS over the ejection port of the Glock was much wider and lower than that of the Roni. This means less or none of the stovepiping issues I found with the Airsoft Roni.
Second was the fact that the muzzle tube of the KPOS is much bigger and allows for more room for the muzzle blast of expand, unlike the much more enclosed space of the Airsoft Roni's muzzle tube, which resulted in flame damage to the muzzle of my Glock's slide.
This picture shows the kit's clearance over the ejection well
This pic shows the muzzle clearance to the pistol
I bought the unit for P32k at Armscor, and it came with the following items:
- Large, black polymer case with gray foam lining;
- Carbine conversion unit;
- Special rear back plate for use with the KPOS;
- Tool for rear plate removal;
- Manual;
- Under the arm sling;
Wednesday, December 14, 2011
Airsoft Carbine Kit Conversion Options for Real Glocks
I finally made the jump, and bought an Airsoft EMA Roni Carbine Conversion Kit for my Glock 23. Before I make the review with pics, I would just like to discuss all the airsoft options for the Carbine conversion of Glock pistols as I learned. Take note that all of this was gathered thru informal conversations with the sellers on my way to getting my Airsoft Roni.
I will not be naming the stores or place where I learned these things, first because I am not sure if they will agree to it as I did not ask their permission to reveal these information. Second is I am not sure of the legality of some of these conversions, I think it is sort of a gray area.
I will be discussing options for the Glock, but will spare a paragraph for the 1911 conversion that I saw.
'Main Options for Glocks'
There are about four airsoft options available for converting Glocks into carbines, and these are the Hera-Arms PDW Kit, the Fab Defense KPOS Kit, the EMA Roni Kit, and the Folding Machine Gun Kit.
According to the seller, the Hera Arms Kit was the first kit that was "explored" for use with real guns, and it worked well. The only problem with the Hera Arms Kit, is that it is not as easy to fit your Glock into it, it seems you need to make some permanent changes that will take a bit more time to do. In short, it is not a quick, drop-in conversion like the Roni. I forgot to ask the price for this unit.
I will not be naming the stores or place where I learned these things, first because I am not sure if they will agree to it as I did not ask their permission to reveal these information. Second is I am not sure of the legality of some of these conversions, I think it is sort of a gray area.
I will be discussing options for the Glock, but will spare a paragraph for the 1911 conversion that I saw.
'Main Options for Glocks'
There are about four airsoft options available for converting Glocks into carbines, and these are the Hera-Arms PDW Kit, the Fab Defense KPOS Kit, the EMA Roni Kit, and the Folding Machine Gun Kit.
According to the seller, the Hera Arms Kit was the first kit that was "explored" for use with real guns, and it worked well. The only problem with the Hera Arms Kit, is that it is not as easy to fit your Glock into it, it seems you need to make some permanent changes that will take a bit more time to do. In short, it is not a quick, drop-in conversion like the Roni. I forgot to ask the price for this unit.
Subscribe to:
Posts (Atom)
-
I decided to write a long piece about Lone Wolf Distributors' (LWD) barrels for Glock, when I noticed that wrong information about these...
-
Here is the second video I made of my Glock 22 in its "Machine Pistol" Mode. I used a small Tri-pod this time, and the focus and ...
-
 I have completed the second assembly for my M4-Based SBR build, and it is the Upper Receiver Assembly. Total price was at Php 22,466 (approx...
 -
 Update History: - Original posted June 17, 2012 - Updated January 29, 2013, add comparative picture with and without DPM System ——————- Afte...
 -
 'Model Confusion' Before anything else, let me just warn everyone that I find the details for the FGG-S-K to be highly confusing. I...
 -
 The third assembly or system I have completed on my M4-Based SBR build is the sighting system. Rifles will be largely useless without a sigh...
